What is Plum Concrete?

What is Plum Concrete?


The word plum means large stones which are termed as boulders or coarse aggregates if technically speaking.

The use of plum concrete is preferred if the required thickness of PCC is excessive or large. This is mainly done below the foundations where due to sleep slope of the strata, the quantity of leveling course could be excessive.

The plum concrete is actually an economical variation of mass concrete.

Plumbs above 160 mm and up to any reasonable size may be used in plain concrete work up to a maximum limit of 20 percent by volume of concrete when specifically permitted by the engineer-in-charge. The plums shall be distributed evenly and shall be not closer than 150 mm from the surface.

Uses of plum concrete:

Plum concrete is used at the water channel beds. It is used mostly in mass concrete works like concrete gravity dams or bridge piers in such cases of rocks about 150 mm in size are used as coarse aggregates to mix a plum concrete.

It is used at side slopes of the embankment to provide a protective laver to earthen foundations and bases.


All about Shrinkage Cracks in Concrete – Types and Causes of Shrinkage Cracks

All about Shrinkage Cracks in Concrete – Types and Causes of Shrinkage Cracks


The shrinkage in concrete can be defined as the volume changes observed in concrete due to the loss of moisture at different stages due to different reasons.

Types of Shrinkage in Concrete:

The shrinkages can be classified into the following:

  • Plastic Shrinkage
  • Drying Shrinkage
  • Antogenous Shrinkage
  • Carbonation Shrinkage

Plastic Shrinkage in Concrete

The water required for concrete strength gain is escaped into the atmosphere due to the process of evaporation, from the surface of the structure, creating cracks on the surface of the structure.

Another reason for shrinkage cracks under plastic shrinkage type is due to the water absorption from the concrete by the aggregate.

Plastic Shrinkage in Concrete

In the case of floors and the pavements, where the surface area is exposed to drying in a large extent compared to the depth when are subjected to the sun and the drying wind, the surface dries very quickly causing plastic shrinkage.

In the case of a mix design where the water cement ratio is high, there is the possibility of excess water pathways causing bleeding. This excess water due to bleeding will accumulate at the surface of the slabs. When these are exposed to dry weather conditions, the surface dries up and collapse creating cracks.

Prevention of Plastic Shrinkage:

  • The escape of water from the surface can be prevented by covering the surface with the help of polyethylene sheeting. Prevention of water evaporation will prevent plastic shrinkage.
  • Proper vibration of the concrete can prevent plastic shrinkage.
  • Plastic shrinkage in concrete structures can be reduced by use of aluminium powder.
  • The use of expansive cement can also help in the control of plastic shrinkage.

Drying Shrinkage

Drying shrinkage is caused by the loss of surface-absorbed water from the calcium silicate hydrate (C-S-H) gel and also due to the loss of hydrostatic tension in the small pores.

Swelling is the opposite phenomenon of shrinkage.

Drying Shrinkage in concrete

This shrinkage is mainly due to the deformation of the paste, though the aggregate stiffness also influences it. It takes place once the concrete has set is called as the drying shrinkage.

Most of the kinds of drying shrinkage take place in the first few months of the concrete structure life.

Autogenous Shrinkage

The water is necessary for the hydration of hydrated cement. This process of water withdrawal from the capillary pores to carry out the hydration of hydrated cement is called as self-desiccation.

The shrinkage dealt with such conservative system can be named as autogenous shrinkage or autogenous volume change.

Autogenous Shrinkage in concrete

This can be largely avoided by keeping the surface of the concrete continuously wet; conventional curing by sealing the surface to prevent evaporation is not enough and water curing is essential. With wet curing, water is drawn into the capillaries and the shrinkage does not occur. Note that autogenous shrinkage is separate from and additional to conventional drying shrinkage, which will start when water curing ceases.

Carbonation Shrinkage:

Carbonation Shrinkage is a decrease in either length or volume of a material(concrete) resulting when carbon dioxide present in the atmosphere reacts in the presence of water with the hydrated cement. Calcium hydroxide gets converted to calcium carbonate and also some other cement compounds are decomposed. Such a complete decomposition of calcium compound in hydrated cement is chemically possible even at the low pressure if carbon dioxide in normal atmosphere. Carbonation penetrates beyond the exposed surface of concrete only very slowly.

Carbonation Shrinkage in concrete

The rate is penetration of carbon dioxide depends also on the moisture content of the concrete and the relative humidity of the ambient medium. Carbonation is accompanied by an increase in weight of the concrete and by shrinkage. Carbonation Shrinkage is probably caused by dissolution of crystals of calcium hydroxide and deposition of calcium carbonate in its place.

Factors affecting Shrinkage:

The main factors affecting shrinkage are listed below:

  • Material Selection
  • Water cement ratio: Shrinkage is mostly influenced by the water-cement ratio of concrete. It increases with the increases in the water-cement ratio
  • Environment conditions : It is one of the major factors that affect the total volume of shrinkage. Shrinkage is mostly occurred due to the drying condition of the atmosphere. It increases with the decrease in the humidity.
  • Chemical composition of Cement :The chemical composition of cement used for concrete & mortar also has some effect on shrinkage. Rapid hardening cement has greater shrinkage than Ordinary Portland Cement.
  • Aggregates : Aggregates with moisture movement and low elastic modulus cause large shrinkage. The rate of shrinkage generally decreases with the increase of the size of aggregates. It is found that concrete made from sandstone shrinks twice than that of concrete of limestone.
  • Type of cement used
  • Admixture in concrete : The shrinkage increases with the addition of accelerating admixtures due to the presence of calcium chloride (Cacl2) in it and it can be reduced by lime replacement.
  • Size and shape of concrete specimen
  • Temperature

How Tower Cranes Build Themselves

How Tower Cranes Build Themselves


When it comes to building skyscrapers, there is no piece of construction equipment more essential than the tower crane. These heavy lifting machines dominate city skylines, hoisting materials and machinery to some of the highest construction sites on Earth.

They have become a part everyday life in almost every major city as contractors race to build high-rise after high-rise, and more than 100 000 can be found in operation around the world at any given time.

Despite how common tower cranes are, they often seem to appear in the sky out of nowhere leaving many of us wondering how they got there in the first place.

The vast majority are erected using mobile cranes that are larger in size, but obviously this cannot always be done when you are building a record-breaking structure and taller cranes simply don’t exist.

Some construction sites in dense urban areas may not have enough space for a large mobile crane either, and many projects also require tower cranes to be erected in stages so that they rise in unison with the constructer portion of the building.

In these scenarios, the cranes must raise themselves to the final working height all on their own using a method known as climbing, and that is what we will be looking at in this post.

In general terms, climbing a tower crane simply refers to the process of adding or removing sections of the mast in order to increase or decrease the overall height.

The concept is fairly straightforward in principle, but it is quite difficult to execute safely in the field with catastrophic consequences if anything should go wrong. It is one of the most dangerous operations that can be performed with a tower crane, and it is only carried out when absolutely necessary to complete a project.

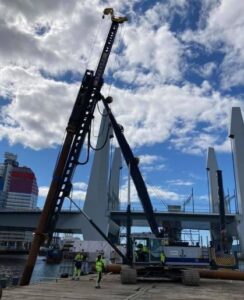
Before climbing can begin, a tower crane must first be erected to an initial height using a suitable mobile crane.

The process begins by constructing a stable foundation, which usually consists of a large concrete slab reinforced with steel rebar, and this takes place about a month before the crane goes vertical so that concrete has enough time to cure.

Once the concrete has reached its full strength, the first steel truss section of the mast is lifted into place, and it is secured with anchor bolts that are embedded in the foundation. Additional sections are then stacked on top of one another to complete the tower portion of the crane, and they are fastened together with high-strength steel bolts.

The mast is topped off with a slewing unit, which is basically a turntable that allows the top of the crane to rotate, and this serves as base for the operator’s cab and lifting components.

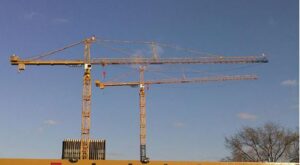
The exact arrangement of the top assembly varies depending on the type of tower crane, but the one shown here has a hammerhead configuration with a cathead and a fixed jib that cannot be moved up or down.

The cathead is the first component to be installed on top of the slewing unit, followed by the counter jib and working jib, and these are connected with steel tie rods that help to transfer loads to the mast.

Once the top assembly is complete, a counterweight is then added to the counter jib, which normally consists of several concrete slabs.

The counterweight helps to balance the load when the crane is performing a lift, effectively reducing the bending moment, or torque, that must be carried by the mast.

Since the working jib is fixed on this particular crane, a trolley system must be used to adjust the radius of the hook so that the load can be positioned closer or further from the mast. This is not the case luffing jib tower cranes, however, as they can adjust the radius simply by raising or lowering the working jib.

In either case, the ability to change the position of the load makes it possible to perfectly balance the crane on top of the mast, and this is essential for the climbing process to be carried out safely.

When a tower crane is ready to be climbed, a steel climbing frame is first assembled around the base of the tower, and it is lifted up to the underside of the slewing unit. The frame has a square cross-section with a lattice structure around three sides, but the front is left open so that new mast sections can pass through.

The top is securely fastened to the underside of the slewing unit with high-strength steel bolts, and a hydraulic jack at the bottom is positioned over a push point on the existing mast.

A new mast section is then hoisted up to the frame, where it is either placed on a steel tray or suspended from a guide rail that extends out above the opening. At this point, the top of the crane must be perfectly balanced over the jack before it can be lifted, which is accomplished by placing a weight on the hook to offset the counterweights.

An additional mast section is typically used for this, and it is positioned at a precise radius from the mast so that there is no net moment applied onto the climbing frame.

The crane top essentially behaves like a large balance scale during the climb, and it could topple off the mast if its center of gravity is not in line with the jack. In addition, the climbing frame is not designed to carry significant torsion, and it is extremely important that the crane is not slewed during the climbing process.

The new mast sections are therefore arranged in a straight line on the ground to eliminate any need to rotate the crane, and the operator will usually leave the cabin during the climb so that the crane cannot be slewed accidentally.

Once the crane is confirmed to be in balance and all safety checks have cleared, the hydraulic cylinder is then pressurized to take the weight of the crane top, and the slewing unit is unbolted from the top of the mast.

The cylinder is used to lift the climbing frame along with the top of the crane until there is enough clearance to insert a new mast section, which usually requires several strokes depending on the cylinder’s length.

The mast section can then be maneuvered inside the frame, where it is bolted to the underside of the slewing unit, and the hydraulic cylinder is depressurized so that the bottom of the new section engages with the top of the existing mast.

After the joints are securely fastened, the cylinder is retracted and repositioned on the next push point, and the whole cycle can repeat until the crane reaches the desired height.

One the process is complete, the climbing frame will either be lowered down the mast or removed entirely until it is needed to raise the crane higher or to bring it back down at the end of construction.


11 Common Types of Cranes

11 Common Types of Cranes


1. Floating Crane :

A floating crane is a ship with a crane specialized in lifting heavy loads. They are useful for loading and unloading heavy items to and from ships. They are also used for transferring equipment from one vessel or platform to another, moving around equipment on the sea deck, and recovering or placing equipment on the seabed.

2. Harbour Cranes:

They are normally used in harbour container lifting operations. Due to their compact design,  Harbour Cranes are the world‘s most flexible and powerful cargo handling equipment in ports and container terminals. Today, they can be electrified by means of powerful motorized cable reels, largely keeping their flexibility and agility within the quay infrastructure.

3. Crawler Cranes:

They can move around on site and the crane is stable on its track without outriggers. The main advantage of crawler cranes is that they can move around on site and perform each lift with little set-up, since the crane is stable on its tracks with no outriggers. An additional advantage is that crawler cranes are capable of traveling with a load.

4. Rough terrain Cranes:

They are mounted with four rubber tires and specifically designed to operate on OFF-ROAD and ROUGH surfaces.

All terrain cranes are considered as the luxury version of a mobile hydraulic cranes, used in common construction sites.

5. Truck mounted Crane:

It is a self propelled loading-unloading machine mounted on a truck body.

6. Level Luffing Crane:

A level luffing crane is a crane mechanism where the hook remains at the same level whilst luffing.

7. Railroad Crane:

A railroad crane is a type of crane used on a railroad for, accident recovery work, permanent way maintenance or freight handling in goods yards.

8. Tower Cranes:

Tower cranes are commonly used in construction of tall buildings.

9. Side Boom Cranes:

They are commonly used to lift industrial pipes lines. Side booms are built to meet the unique demands of pipeline customers.

10. Aerial Cranes:

An aerial crane or flying crane is a helicopter used to lift loads.

11. Gantry Crane:

A gantry crane is a crane built at the top of a gantry, which is capable of lifting some of the heaviest loads in the world.

How Bridges Are Built Over Water?

How Bridges Are Built Over Water?


Bridges are marvels of engineering that stand inconspicuously amongst us. We don’t think of them much even when we are passing over them. Nowhere are these structures more impressive then when the are built over water, which brings us to the question how are bridges built over water?

When the water is shallow, construction is easy. A temporary foundation is made on which piers are built to support the upper structure and the bridge is then built! It’s when the water is deep that other techniques are needed.

There are many methods to complete such as task in deep water but here we will explore the main three. These three methods of bridge building are called battered piles, cofferdams and caissons.

Battered Piles:

These are poles that are driven into the soil underneath the water. Piles are hammered into the water until the turn outward or inward at an angle. This makes the piles firm and increases their ability to carry lateral loads.

Piles are inserted in the ground using pile drivers. These are mechanical devices that may be transported to a location on a floating pile driving plant.

Battered Piles at a bridge project in Sweden

Pile drivers may also be cantilevered out over the water from piles that have been installed in advance. With the use of pile frames, pile hammers and winches, pile drivers hammer the piles into the soil until the turn outward or inward at an angle. The pile are now ready to carry lateral loads and can provide the foundation of support for the bridge.

The next step is to construct the pile caps above the piles. Once this is done, the bridge is ready to be built.

Cofferdams:

These are temporary enclosures made be driving sheet piling into the bed of a body of water to form a watertight fence. This is called the cofferdam. There is more to this bridge technique. Once the sheet piles have been inserted in the water to create a cofferdam, the water is pumped out of the enclosure.

Now, the construction workers can built the bridge as if the are working on dry land. The process then becomes relatively easy.

Cofferdam

Caissons:

There are two types of caissons, open and pneumatic.

An open caisson is a structure that is usually shaped like a box. It is open, at the top and bottom. The caisson is usually constructed on land then floated into position and sunk, so that the upper edge is above water level.

The caisson has a cutting bottom edge so that it sinks through soft silt on the bed. Inside is a series of large pipes or dredging wells. These are used to dredge up the bed material. As more material is dredged up, the caisson sinks and more sections are added to the shaft to keep it above water.

Once the caisson reaches the correct depth, concrete is laid to seal the bottom and then more concrete is poured into the caisson to form a solid post.

Steel Open Caisson

A pneumatic caisson is similar to an open caisson but it has an airtight bulkhead above the bottom edge. This is fitted with air locks. The space between the cutting edge and the bulkhead is called the working chamber. In this space, the water is removed using air pressure. Construction workers can then enter the chamber and excavate the soil.

It is important that the air pressure in the chamber be carefully monitored so the workers do not get the bends.

Pneumatic Caisson

But how do engineers pick which technique to use?

This all depends on the condition of the site and the technology available. These are important decisions to make that only exports can fully handle.

What You Need To Know About Concrete

What You Need To Know About Concrete


Concrete is as much a part of the urban landscape as trees are to a forest. It’s so ubiquitous that we rarely even give it any regard at all. But underneath that drab grey exterior is a hidden world of compexity.

Concerete is one of the most versatile and widely-used construction materials on earth. It’s strong, durable, low maintenance, fire resistant, simple to use, and can be made to fit any size or shape from the unfathomably massive to the humble stepping stone.

However, none of those other advantages would matter without this : it’s cheap. Compared to oter materials, concrete is a bargain and it is easy to see why if we look at what’s made of.

Concrete has four primary ingredients : Water, sand (also called fine agregate), gravel (aka coarse aggregate) and cement.

A recipe that is not quite a paragon of sophistication, one ingredient falls from the sky and the rest essentially straight out of the ground. But, from these humble beginnings are born essentially the basis of the entire world’s infrastructure.

Actually, of the four, cement is the only ingredient in conrete with anay complexity at all. The most common type used in conrete is know as Portland cement. It’s made by quarried materials (mainly limestone) into a kiln, then grinding them into a fine powder with a few extra herbs and spices.


Cement role :

Cement is a key constituent in a whole host of construction materials, insluding grout, mortar, stucco and of course concrete. A lot of people don’t know this, but every time you say cement when you were actually talking about concrete, a civil engineer’s calculator runs out of batteries.

The cement key role es to turn concrete from liquide to a solid. Portland cement cures not through drying or evaporation of the water, but through a chemical reaction called hydration.

The water actually becomes a part of cured concrete, this is why you shouldn’t let concrete dry out while it’s curing. Lack of water can prematurely sop the hydration process, preventing the concrete from reaching its full strenght.

In fact, as long as you avoid washing out the cement, concrete made with Portland cement can be placed and cured completely under water. It will set and harden just as well (and maybe even better) as if it were placed in the dry.

Aggregate role :


But, you may be wondering « If water plus cement equals hard, what’s the need for the aggregate ? ».

To answer that question, let’s take a closer look by cutting this sample through with a diamond blade. Under a macro lense, is tarts to become obvious how the individual constituents contribute to the concrete.

Aggregates for Concrete

Notice how the cement paste filled the gaps between the fine and coarse aggregate. It serves as a blinder, holding the other ingredients together.

You don’t build structures from pure cement the same way you don’t build furniture exclusively out of wood glue.

Instead we use cheaper filler materials – gravel and sand – to make up the bulk of concrete’s volume. This saves cost, but the agregates also improve the structural properties of the concrete by increasing the strenght and reducing the amount of shrinkage as the concrete cures.

The reason that civil engineers and concrete professionales need to be pedantic about the difference between cement and concrete is this : even though the fundamental recipe for concrete is fairly simple with its four ingredients, there is a trmendous amount of complexity involved in selecting the exact quatities and characteristics of those ingredients.

In fact, the process of developing a specific concrete formula is called mix design. One of the most obvious knobs that you can turn on a mix design is how much water is inluded. Obviously, the more water you add to your concrete, the easier if flows into the forms. This can make a big difference to the people who are placing it. But, this added workability comes at a cost to the concret’s strenght.


Water Towers Types

Water Towers Types


Water towers are used as a local source of water at times of peak demand where it would not be economical to increase the size of the supply pipeline and add a booster pump installation.

In undu-lating terrain ground-level storage can provide the pressure needed but in areas of flat topography the storage must be elevated. Many shapes and design features are possible but the designer should aim to produce a structure that meets the requirements of both water supply and planning authorities, bearing in mind that it will become a landmark in the community which it serves.

Ancillary equipment including pipework, valves, ladders, instrumentation and booster pumps, if required, can all be hidden in the cylindrical shaft.

The optimum depth/diameter ratios should be determined taking into account the most efficient shape and the needs of the distribution system. It is usually advisable to avoid large pressure fluctuations in distribution that may be caused by draw down or filling in excessively deep tanks.

The main types of water towers are:

1- Concrete water towers:

Concrete water towers are built with capacities up to about 5000 m3. They are usually circular in plan although rectangular concrete towers have been built. The diameter of circular water towers is not usually sufficient to warrant the use of prestressing since cracks can be controlled by applying normal water retaining concrete criteria.

Concrete water towers allow some scope for architectural statement so that the result can be regarded as a visual asset.

Reinforced concrete water tower

Rectangular water towers are designed as small monolithic service reservoirs with the floor slab supported on some form of open column and beam framework or on a hollow vertical shaft, it self founded on a base slab, piled if necessary.

Wind and seismic loads should be taken into account in the design of tank, supports and foundations. Circular concrete water towers allow more scope for different styling from a simple cylinder with a flat base to a sophisticated form such as the hyperbolic-paraboloid of the 39 m high Sillogue tower near Dublin airport built in 2006.

Sillogue Reservoir

In this case the vase shape resembles an inverted version of the nearby control tower. The Intze type water tower (Rajagopalan, 1990) is designed so that bending moments are as near zero as possible at all sections.

Reinforced concrete water tower (Intze type)


2- Welded Steel Water Towers


Relatively small welded tanks have been used for over 100 years for industry and rail transport.These were usually small radius cylinders supported on a framework of steel columns with braces or ties.

Welded steel water towers of capacities up to 15 000 m3are now available and have been widely used all over the world, particularly in North America, the Middle East and the Far East.

These are now constructed of butt welded steel plate in several configurations: spheroids or ellipsoids on tubular columns belled out at the base; cylindrical or spherical shapes with conical bases and supported on wide steel columns which help resist seismic loads and provide space for plant rooms or offices or on a reinforced concrete frame.

Whilst the forms available for welded steel water towers do not offer much scope for architectural treatment, the coatings provide an opportunity for decoration and can be attractive.

Welded Steel Water Towers


3- Segmental Plate Tanks

The type of steel or GRP panel construction can also be used for elevated storage. However, it is unlikely that segmental plate tanks would be used for anything other than industrial or emergency water storage since their poor visual appearance is exaggerated by height.

Where they are used, the bases are placed on a series of beams which are supported on a framework of braced columns.

GRP Water Storage Tanks


The Benefits Of Machine Control and GPS

The Benefits Of Machine Control and GPS


What Is GPS and How Does It Work?


GPS is a product of the Cold War. Developed by the US military during the President Reagan years, this system consists of a series of 24 satellites in geosynchronous orbit. That is, these satellites remain in the same fixed location in the sky. Out of 360 degrees of longitude, each satellite covers a 15-degree sweep of the globe. They orbit the earth twice each day, broadcasting a timing signal. These signals can be intercepted by ground antennae mounted on ships, tanks, planes—or the buckets and blades of heavy earthmoving equipment.

Though, like all broadcast signals travelling at the speed of light, there is a small-but-measurable time lag between the signals from adjacent satellites. The difference, measured in milliseconds, allows for the triangulation between the ground antennae and the satellites emitting the signal. This triangulation measurement allows for the measurement of the precise location (measured in latitude, longitude, and elevation above sea level) on the surface of the earth where the receiving antennae is currently located. As is true so often in the history of technology, a technical advancement meant for use in war has been modified and adopted for peaceful civilian applications. A system intended to track the movements of men, weapons, ships, and war planes is now used to follow the movements of commercial shipments, find lost hikers, and guide construction equipment.

GPS guides equipment operations through their Automated Positioning Report System (APRS). Using triangulation between the several of the system’s broadcasting satellites allows for positional measurements with accuracies up to 30 centimeters (1 foot). The use of APRS increases this accuracy to 1 centimeter when used in conjunction with GPS. What APRS does is integrate GPS with the equipment’s controls. An APRS replaces the manually operated hydraulic drive cylinders traditionally used to control the movements of an excavator’s arm or dozer’s blade with electronically controlled servo-type valves. These servos send an electric current that creates magnetic field that rotate suspended armatures, that are further connected to fixed flapper arms. These flapper arms provide the linkage to the rotary spools that increase and decrease hydraulic pressure to the hydraulic systems. These are part of the closed-loop hydraulic system that controls the direction, flow rate, and applied pressure of the hydraulic fluid.

Going from individual pieces to equipment to an entire fleet of equipment or trucks is also easily managed by GPS applications. This allows a fleet owner to coordinate and choreograph the movements and activities of an entire fleet of earthmoving equipment and also track the locations of trucks delivering material to the site or hauling dirt away for disposal. Like pieces on a chessboard (or, more accurately, objects in a video game) these activities are tied to an onsite digital terrain model (DTM) of the project site.

This is a three-dimensional (3D) model created by an AutoCAD program, which utilizes a patchwork of connected triangles. The corners of each triangle is defined mathematically by three special coordinates (northing, easting, and elevation). While not a perfect match (no model ever is) to the actual terrain, this geometric surface comes the closes to matching actual surfaces. This is especially true for post construction or excavation surfaces, which tend to be regular and smooth.

Leica excavator machine control solution

The software interacts with the model and the equipment hardware via sensors attached to the business end of the machine (the edge of the dozer blade, the teeth of an excavator bucket, etc.). These sensors continuously record and update the movements of the equipment using the same 3D location system as the DTM. The sensors relay their current location back through the system to the operating controls, which in turn direct the movement of the equipment in accordance with the programmed DTM for the proposed construction surface or excavation grades.

Coordinating all of the mobile GPS sensors on each piece of equipment is a stationary GPS sensor combined with an antenna with a receiver called the base station that is set up adjacent to the operating area. The base station is permanently located over a pre-surveyed reference point, such as a third order benchmark that has been established by ground survey. If necessary, some relative location (manhole rims, street curbs, and building corners, etc.) whose elevation is not exactly known but can be treated as a local datum for the project area can also be utilized for ground antennae setup.

Grader GPS Control

The hardware for these control signals consists of a control box connected to the servo valves via electrical cable, which, in turn, connects to the hydraulic control system that physically moves the equipment. It is the incoming satellite data from the GPS system that tells the equipment where it is. The DTM design files are stored in a compact-flash memory card, memory stick, or accessed externally from data broadcast by the site’s controlled area network (CAN). The database, CAN, and GPS operate in real time to place a blade or bucket exactly where it needs to go and move it so that it accomplishes its task with the need for rework or wasted effort. All three elements, mobile sensors, base sensors, and equipment operator are in continuous communication with each other. The blades and buckets simultaneously move back and forth, up, and down in combination to achieve the desired movement.


Where and When Is GPS Best Used?


The advantages of using GPS guidance systems are legion. Using advanced systems, an operator can increase productivity by greater than 50% compared to purely manual operations. The increase in productivity comes indirectly by the avoidance of having to perform rework at the site. Guided by GPS, an equipment operator can get his cuts and placements right the first time. Furthermore, material wastage is minimized. GPS doesn’t necessarily increase the number of productive hours per day so much as it makes every hour a machine is active much more productive.

This has all sorts of secondary benefits and cost savings. Getting the most out his earthmoving equipment allows a contractor to get the most out of his workforce as well. This reduces labor costs, another costs savings, while reducing the impact of local labor shortages—always an issue in a booming economy with a considerable amount of construction activity. Furthermore, grades and elevations can be checked in real time as the work is being performed. The operator can check his elevation from within his cab as he is working. There is no more need to stop work at regular intervals and have a manual survey performed of the work zone to check its accuracy. In the past, the accuracy-checking task has traditionally relied on a crewmember inside the trenches to manually check depths and slopes. Now with these systems, the need for that task is greatly reduced—thereby cutting job site costs and improving crew safety. This traditional cause of equipment downtime is mostly avoided with the use of GPS.

Giving operators the tools to perform accuracy checks also gives greater responsibility, initiative, and job satisfaction. The additional training that the operators receive has the effect of empowering them, increasing senses of purpose and self-worth. This alone has a marked, if indirect, impact on productivity. By eliminating rework and improving employee morale, any money spent training operators on GPS is a wise investment that pays for itself very quickly. Human factors also show improvement in the area of site safety. The precision guidance and ability to choreograph equipment movement across a busy site improves safety by maintaining safe work zones, avoiding known utility locations, preserving the foundations of existing structures, and maintaining a safe flow of traffic.

GPS systems are often augmented by laser guidance for precise finish work. Lasers can compensate for some of GPS limitations. GPS works best with an open sky and no significant overhead blockage. (For example, GPS is not used for tunneling operations.) Laser guidance stations and targets mounted on equipment blades can work in any outdoor situation, with or without overhead blockage from trees and tall buildings. GPS, however has a much greater effective operating range, limited only by the availability of open sky. Lasers systems are usually limited to about 1,500 feet. GPS can allow for the construction of complicated surface models as well as flat, sloping surfaces. Lasers, being line of site instruments, are usually limited to operations on long, flat, or sloping surfaces. (Though they, too, can build surfaces as directed by a 3D design model represented by a surface AutoCAD file.)

Grade Control System

Productivity can be measured in many ways: time savings, labor costs, material costs, fuel costs, quality bonuses, and finish bonuses. It begins as early as the job layout.

With Machine Control and GPS, you don’t have to wait for someone to stakeout the project or weather that permits someone to stakeout. This allows you to get started sooner. Any design change will also benefit as productivity increase due to not having to wait for restaking.

As the operator starts moving material you will see great value in being able to move the correct amount of material, to the correct location, the first time. This, along with only using the exact amount of material, will translate into a productivity savings.

You can also use GPS by having job layouts of the site so the machines or supervisors’ tablets can have the precise storage locations of materials, job trailers, or site boundaries. This can help having the right things in the correct location or, better yet, not in the way, therefore reducing excessive handling of material.

Drilling Wells Methods – Advantages and Disadvantages

Drilling Wells Methods – Advantages and Disadvantages


There are several different types of drilling methods. Choosing a method depends on many factors including soil type, underground water level and common practice in every country. Cities using groundwater usually depend upon deep wells. These wells have the advantage of tapping deep and extensive aquifers. All deep wells are drilled wells. The successful digging of drilled wells requires special training, experience, tools and equipment.

The main methods of drilling wells are :

1- Rotary Drilling

The principle of rotary drilling is based upon a rotating drill stem made of lengths of drill pipe about 15 feet long. A bit is attached to a heavy stabilizer or drill collar at the end of the column of drill pipe. The extra weight and larger outside diameter of the stabilizer just above the bit helps to maintain a straight drill hole. The drill stem is hollow and has a drilling fluid of either mud or air circulating down the drill stem out through the nozzles in the bit and up along the outside of the drill stem. The rotating action of the bit breaks up the material and the drilling fluid carries the cuttings to the surface where they settle out in a mud tank.

Advantages:

  • Speed of Drilling: 5 to 7 times faster than cable tool, capable of several hundred feet per day (dependent on geologic material).
  • Options of Well Design: Screen can be telescoped or attached, separate screens can be installed, filter packing to enhance formation production, down holle casing hammer method.
  • Grouting: Oversized borehole requires grouting of annular space surrounding casing, most adaptable to various grout placement methods, practical for grout placement thru casing.

Disadvantages:

  • Cost of Equipment: 5 times as costly as a cable tool or jetting rig, bit cost and tooling more
  • Maintenance & Support: Much more extensive and costly than cable tool, higher fuel consumption, water truck needed.

2- Cable Tool Drilling

Cable tool drilling, also known as percussion drilling or spudding, is a widely used well drilling method.

Although it is a slower drilling method, the cable tool is less costly and simpler to operate than a rotary drill rig and is suitable for most geologic conditions.

The cable tool operates by raising and dropping a heavy drill string in the drillhole. The drill string, with bit on the bottom and rope socket (or swivel socket) on top, is suspended in the hole with a cable. The cable is threaded over the crown sheave located at the top of the mast, down to the walking beam, and onto the cable drum where it is stored.

The up-and-down drilling action imparted to the drill stem and cable by the walking beam. The walking beam is pivoted at one end, has a cable sheave at the other end and is connected to the crank gear with a pitman. Rotation of the crank gear causes the walking beam to move up and down. Additional cables called sand lines or casing lines are used to raise and lower casing, bailers, plungers, or other tools.

Advantages:

  • Inexpensive Equipment: 1/5 cost of rotary rig, less grouting equipment needed, large water truck unnecessary, lower fuel consumption, lower operating cost.
  • Limited Tooling Required: Bits can be resurfaced, less expensive tooling, used items readily available.
  • Less Material Removed During Drilling: Generally, no oversized borehole, material removed from casing inside diameter, lighter soils can be bailed from casing.
  • Repair Work: Cable tool rigs ideal for casing reaming, screen replacement, and

Disadvantages:

  • Slow Drilling Speed: Bedrock drilling – 1/7 as fast as rotary drilling, Glacial drift drilling – 1/5 as fast as rotary drilling
  • Depth Limitations with Single Casing String: Driving generally difficult in caving formations, ability to drive casing is limited by tool weight and ground
  • Outer Casing Needed for Gravel Packing or Full Length Grouting: 3 to 4 inch larger casing needed to maintain annulus and must be extracated during grouting.
  • Steel Casing Material Only: PVC casing can not be used unlesss installed in an oversized borehole without driving.

3- Auger Drilling


The auger method utilizes spiral augers, usually in 5 foot lengths. The auger stem is turned by a hydraulically-controlled rotary drive head. After drilling the length of an auger, the auger joint is broken and another 5 foot section is added.

Cuttings spiral their way up to the surface where they appear around the borehole, making formation identification relatively simple. If enough clay is present in the formation, the drillhole will remain open when augers are removed.

Dry sands and other caving formations may be a problem for the auger driller and will occasionally result in the loss of long flights of augers. When the auger encounters saturated sand (the water bearing formation to be screened), drilling generally can be continued for a short distance but the hole will not remain open in the saturated formation when the augers are removed.

The auger flight is then broken down and removed from the drillhole after drilling the depth of the well or when changing to another type of drilling operation.

Advantages:

  • Speed of Drilling: Fast for shallow holes without cobbles or gravel and with low water table, auger/cable tool or jetting combination rigs are common
  • Limited Equipment: Less expensive than rotary, minimal amount of equipment

 Disadvantages:

  •  Limited Depth: Poor results in caving formations, gravel, or high water table, less than 100 feet.


4- Hand Driving

Driven wells are common in many areas, especially around lakes where groundwater may be close to the surface.

Simple installation methods and the low cost of materials make them attractive to homeowners or cottage owners who wish to install their own water supplies.

However, since the well point and casing are driven into the ground, soil conditions are a major factor in suitability of the site. The site must be generally sandy and free of boulders or bedrock to be suitable for a driven well. Hard clay, silt, and very fine sand are generally difficult to drive through.

The installation of a driven well often begins by augering a hole with a hand auger or posthole digger as far as possible. A drive point, consisting of a reinforced well screen with a steel point on the end, is coupled to a 5 foot length of galvanized casing. The most common casing size for driven wells is 1-1/4 inch inside diameter.

A drive cap is placed an the top of the casing and a heavy weight is used to strike the top of the drive cap, driving the point into the ground, When the drive cap is driven close to the ground and driving cannot be continued, another length of casing is added and driving is resumed.

Special drive couplings are used to join sections of casing, Hand driving is usually accomplished by using a weighted driver consisting of a 3 or 4 foot piece of 3 inch diameter pipe capped on the top end. Extra weight is placed in the top portion of the driver. The driver fits over the casing and is guided by it. Another type of driver has a steel rod on the bottom that slides into the casing through a hole in the drive cap.

Raising and dropping the driver is done with the use of handles welded on the sides of the driver. The weighted driver may also be suspended from a tripod and tackle arrangement. The use of a sledge hammer for driving is not recommended since it may result in bent or broken casing from glancing blows.

5- Jetting


Jetting is a drilling method suited for the sandy areas. Jetting remains a popular method for drilling small diameter wells due to its simplicity and inexpensive cost of equipment. Many of the portable, do-it-yourself drilling machines advertised in magazines utilize the jetting method.

Jetting and hollow-rod equipment are quite similar except that drilling water is pumped with the jetting method and the direction of water flow is opposite.

The jetting method involves using a high velocity stream of water to break up the formation material and wash the cuttings away. A chisel-shaped bit with holes to serve as nozzles is attached to the end of a string of hollow drill pipe. Water pressure is provided to the nozzles by using a high-pressure pump.

Water exits from the nozzles and loosens the material being drilled while keeping the bit clean. The bit is raised and lowered and rotated slightly to maintain a round hole. The cuttings are washed to the surface on the outside of the drill pipe and flow into a settling pit or tank.

Cutting samples are easily obtained at this point. A 55 gallon drum is often used for this purpose. After cuttings are allowed to settle, the water is recirculated through the pump, swivel, drill pipe and down to the bit. Jetting can also be done without recirculation of the drilling water; however, a continuous supply of water must be available at the site.

6- Hollow-Rod


Drilling Hollow-rod is referred to as the hydraulic-percussion drilling method.

The hollow-rod is an old drilling method that can be time consuming in some situations, but remains popular due to its simplicity and relatively low cost of equipment.

Most hollow-rod wells are 2 inch diameter, but 4 inch casings are installed occasionally. This method is well suited for sand and soft clay formations with relatively few boulders. It can also be used for drilling rock wells, but progress is slowed considerably. Wells several hundred feet in depth have been completed by the hollow-rod method.

The drill string used in hollow-rod drilling is similar to that used in jetting, except that the chisel bit has a ball check valve in it. Water or a clay-water mixture is kept in the annular space between the drill rods and well casing to help prevent the uncased portion of the hole from collapsing.

The water is supplied to the annulus by gravity intake from a small mud tank. A 55 gallon drum is often used as a settling tank. Drilling is done by lifting and dropping the drill stem and bit. The drill pipe used has triple wall thickness to add weight to the drill string.

The drill string is also rotated slightly by hand during each stroke to maintain a round drill hole. As the bit drops, the ball check opens and mud and cuttings enter the hollow drill rods. On the upstroke, the check valve closes and keeps the cuttings in the drill rods.


Advantages:

  • Inexpensive Equipment: 1/5 cost of rotary rig, less grouting equipment needed, large water truck unnecessary, lower fuel consumption, lower operating cost.
  • Limited Tooling Required: Bits can be resurfaced, less expensive tooling, used items readily available, many tools
  • Less Material Removed During Drilling: Generally no oversized borehole, material removed from casing inside diameter.
  • Repair Work: Jetting rigs ideal screen replacement and development.


Disadvantages:

  •  Slow Drilling Speed: Bedrock drilling – uncommon, requires heavy drill bar, 1/7 as fast as rotary drilling, Glacial drift drilling – 1/5 as fast as rotary drilling, limited use in gravel formations.
  • Depth Limitations with Single Casing String: Driving generally difficult in caving formations, ability to drive casing is limited by tool weight and ground
  • Outer Casing Needed for Gravel Packing or Full Length Grouting: 3 to 4 inch larger casing needed to maintain annulus and must be extracated during grouting.
  • Steel Casing Material Only: PVC casing can not be used unlesss installed in an oversized borehole without driving.


Types and Applications of Fly Ash in Construction

Types and Applications of Fly Ash in Construction


Since wide scale coal firing for power generation began in the1920s, many millions of tons of ash and related by-products have been generated. The current annual production of coal ash world-wide is estimated around 600 million tones, with fly ash constituting about 500 million tones at 75–80% of the total ash produced.

Thus, the amount of coal waste (fly ash), released by factories and thermal power plants has been increasing throughout the world, and the disposal of the large amount of fly ash has become a serious environmental problem. The present day utilization of ash on worldwide basis varied widely from a minimum of 3% to a maximum of 57%, yet the world average only amounts to 16% of the total ash.

Fly ash is generally grey in color, abrasive, mostly alkaline, and refractory in nature. Pozzolans, which are siliceous or siliceous and aluminous materials that together with water and calcium hydroxide form cementitious products at ambient temperatures,are also admixtures.

Fly ash from pulverized coal combustion is categorized as such a pozzolan. Fly ash also contains different essential elements, including both macro nutrients P, K, Ca, Mg and micro nutrients Zn, Fe, Cu, Mn, B, and Mo for plant growth. The geotechnical properties of fly ash (e.g., specific gravity, permeability,internal angular friction, and consolidation characteristics) make it suitable for use in construction of roads and embankments, structural fill etc.

The pozzolanic properties of the ash, including its lime binding capacity makes it useful for the manufacture of cement, building materials concrete and concrete-admixed products.

Fly Ash Types :

There are two common types of fly ash: Class F and Class C.

Class F fly ash contain particles covered in a kind of melted glass. This greatly reduces the risk of expansion due to sulfate attack, which may occur in fertilized soils or near coastal areas. Class F is generally low-calcium and has a carbon content less than 5 percent but sometimes as high as 10 percent.

Class C fly ash is also resistant to expansion from chemical attack. It has a higher percentage of calcium oxide than Class F and is more commonly used for structural concrete. Class C fly ash is typically composed of high-calcium fly ashes with a carbon content of less than 2 percent.

Currently, more than 50 percent of the concrete placed in the U.S. contains fly ash.2 Dosage rates vary depending on the type of fly ash and its reactivity level. Typically, Class F fly ash is used at dosages of 15 to 25 percent by mass of cementitious material, while Class C fly ash is used at dosages of 15 to 40 percent.3

Fly Ash Applications :

Utilization of fly ash appears to be technically feasible in the cement industry. There are essentially three applications for fly ash in cement

(1) replacement of cement in Portland cement concrete

(2) pozzolanic material in the production of pozzolanic cements

(3) set retardant ingredient with cement as a replacement of gypsum

Cement is the most cost and energy intensive component of concrete. The unit cost of concrete is reduced by partial replacement of cement with fly ash.

The utilization of fly ash is partly based on economic grounds as pozzolana for partial replacement of cement, and partly because of its beneficial effects, such as, lower water demand for similar workability, reduced bleeding, and lower evolution of heat.

It has been used particularly in mass concrete applications and large volume placement to control expansion due to heat of hydration and also helps in reducing cracking at early ages.

The major drawback of fibre reinforced concrete is its low workability. To overcome this shortcoming, a material is needed, which can improve the workability without comprising strength.

The use of fly ash in concrete enhances the workability of concrete and being widely recommended as partial replacement of cement. This also reduces the cost of construction. Fly ash concrete provides much strong and stable protective cover to the steel against natural weathering action.


error: Content is protected !!
Exit mobile version